Two Rebel Haversacks in the Florida Confederate Museum Collection
By Fred Adolphus, April 12, 2014
By Fred Adolphus, April 12, 2014
In October 2013, I had the privilege of viewing the phenomenal “Florida Confederate Museum” collection of Richard Ferry. This eclectic collection held some of the most amazing Confederate artifacts I have seen. I will include many of them in subsequent articles, but for the time being I want to share with readers two interesting Confederate haversacks. One is a typical, mass-produced army haversack from either Virginia or North Carolina. The other is a custom made product captured by Federal soldiers at the Battle of Olustee, Florida.
The quartermaster-made haversack comes from the Goulding family. At least two Goulding brothers served in the Army of Northern
Virginia. Both were from Darien, Georgia. Francis R. Goulding served with the Jeff Davis Legion, Mississippi Cavalry, and ended the war in a hospital in Charlotte, North Carolina. His brother, C.H. Goulding, served with the 8th Georgia Infantry. C.H. Goulding died in General Hospital 21, Richmond, Virginia, December 24, 1862 of “remittent fever” (caused by gonorrhea). The collection has a number of objects from the Goulding family, to include Francis’s vest fashioned from a Tait jacket. The vest has strong provenance to Francis, but the haversack’s story is murkier, since family legend attributes it to C.H. The connection with C.H. is tenuous, because it is unlikely that the hospital would have returned a haversack to the family in 1862, unless it contained other personal items. Even then, sending this home would have been an extravagance that stretches plausibility. It is more likely that the haversack belonged to Francis, and that he brought it home with his vest and other Confederate memorabilia. This makes sense to me, because the haversack is clean and in good
condition. It is likely that Francis got this fresh haversack while he was in the hospital in Charlotte, and the war ended before it saw any heavy field use. In any case, the haversack is an amazing example of a cheap, simple, mass-produced Confederate haversack, typical
of what Southern soldiers received from the quartermaster.
The Goulding haversack is made of a coarse, unbleached osnaburg. The satchel is not enameled, has no gussets, and the flap closes with a single bone button. Typical of Confederate haversacks, the satchel’s depth exceeds its width. There is a small, plaid “poke”sack sewn to the front opening of the satchel, and suspending it on the inside. The strap is made of the same material as the satchel, being folded over and sewn closed. This artifact embodies what most collectors consider the quintessential Confederate haversack. In fact, my own research indicates that about two-thirds of Confederate haversacks had enameled satchels (the straps were seldom enameled), and web straps. However, this does not distract at all from the artifact’s appeal as the following images show.

Image 1: The front view shows the satchel's two-piece construction, with the rear piece cut large to accomodate the front flap.
|

Image 2: The sketch of the satchel's front view includes some basic dimensions.
|

Image 3: This offers a complete front view of Goulding's haversack.

Image 4: This offers a complete rear view of Goulding's haversack.

Image 5: The carrying strap is made of doubled over osnaburg with a finished width of about one and a quarter inches.

Image 6: A sketch of the haversack's rear includes dimensions for the strap.
|
|


Image 8: A close-up image of the flap's exterior shows that each corner is sewn closed.
|

Image 9: A sketch of the haversack flap exterior includes detailed dimensions.
|

Image 10: The interior of the open flap reveals construction details.
|

Image 11: A sketch of the haversack flap interior provides detailed dimensions.
|

Image 12: The flap's right corner is sewn down and the front opening edge has employed the fabric's selvedge that alleviates the need for a folded seam.
|

Image 13: The flap's left corner mirror's the right.
|

Image 14: This image provides a close-up of the bone button and the stitching for its triangle-shaped reinforcement. The haversack's integral small "poke" sack is also visible where it is sewn to the front opening edge.

Image 16: This view shows the poke sack from the other side. Its opening was closed by means of a drawstring sewn into a seam. Exactly what Goulding kept in this small sack is a matter of speculation.
|

Image 15: The poke sack has been pulled out of the haversack's satchel. It was suspended from its closed bottom, sewn to the top edge of the opening, with the opening hanging downward.

Image 17: This sketch includes the poke sack's basic dimensions.
|

Image 18: This view shows the poke sack's opening and drawstring.
|

Image 19: On the inside of the front of the satchel, one can see the button's reinforcement triangle that has been whip-stitched in place.
|

Image 20: This image provides a good view of the back of the satchel.

Image 21: The strap attaching to the left rear corner of the haversack (when viewed from the back) shows that this was not necessarily "built to last" but rather sewn to last just long enough, until the haversack got worn and dirty and had to be replaced. The lack of sturdy stitching in this high-stress area suggests that haversacks worn out quickly and were issued frequently.
|

Image 22: An accompanying sketch for Image 21 provides basic dimensions for the strap attachment.
|

Image 23: The strap attachment on the right rear corner mirrors the construction noted in the previous two images.
|

Image 24: The right rear corner strap attachment's sketch includes its basic dimensions.
|
The
other haversack’s story is more fascinating than that of the first. This haversack was scavenged from the Olustee
battlefield by Federal soldiers in the wake of Colonel Hawley’s charge against
the Confederate line, February 20, 1864.
Donors, presumably Union veterans of the Battle of Olustee, gave it to
the Nathaniel Lyon G.A.R. Post No. 2, Department of Connecticut, after the war.
When the post closed, the membership
transferred title of the haversack to a private collector.
Aside from the excellent provenance, the artifact is an interesting example of a custom made haversack. The satchel is made from coarse, unbleached osnaburg. It consists of five pieces: front and rear panels; side gussets, and a bottom gusset. The flap is a separate piece of enameled cloth attached to the rear panel at the satchel’s opening. The strap, which survives as only two remnants, was originally a heavy-weight leather strap, 15/16” wide, that is riveted to the outside side gussets. All of the pieces are joined together with a widely-spaced basting stitch, and it is a wonder that held together so well. The fact that the loose stitching shows no signs of having burst open suggests that the haversack was not in use very long before it was taken as a battle-field souvenir. The stitching would have been unacceptable for a depot-made haversack because the satchels had to endure the stress of carrying a heavy load, and the basting stitch could not bear such stress for long.
Another feature worth noting is the manner for securing the flap. The flap itself has two cotton tie tapes secured near the bottom edge. The front panel has two buttons corresponding roughly to the placement of the tie tapes. The arrangement seems awkward, however, because tie tapes do not lend themselves to securing to buttons, and the buttons are set far too high to align with the tapes when the flap is closed. There is no ready explanation for this, but then, young soldiers fashioned numerous field modifications that were not entirely perfect.

Image 25: This front view shows the flap down. Interestingly, the tie tapes do not apparently secure to anything.

Image 26: The front of the haversack with the flap open reveals two buttons, that align with the tie papes, but are placed somewhat high to have been conveiently used to secure the tapes.
|

Image 27: The front view sketch of the open haversack includes basic dimensions.
|

Image 28: The rear of the open haversack is visible here.
|

Image 29: A sketch of the rear of the open haversack includes dimensions.
|

Image 30: The artifact still bears the label identifying its provenance: an remarkable piece of luck!
|

Image 31: Another label inside identifies the Grand Army of the Republic (G.A.R.) Post.
|

Image 32: The cut-away carrying strap on the right side is visible. The maker pushed a button-style finial through the end of the strap, rendering a makeshift swivel.
|
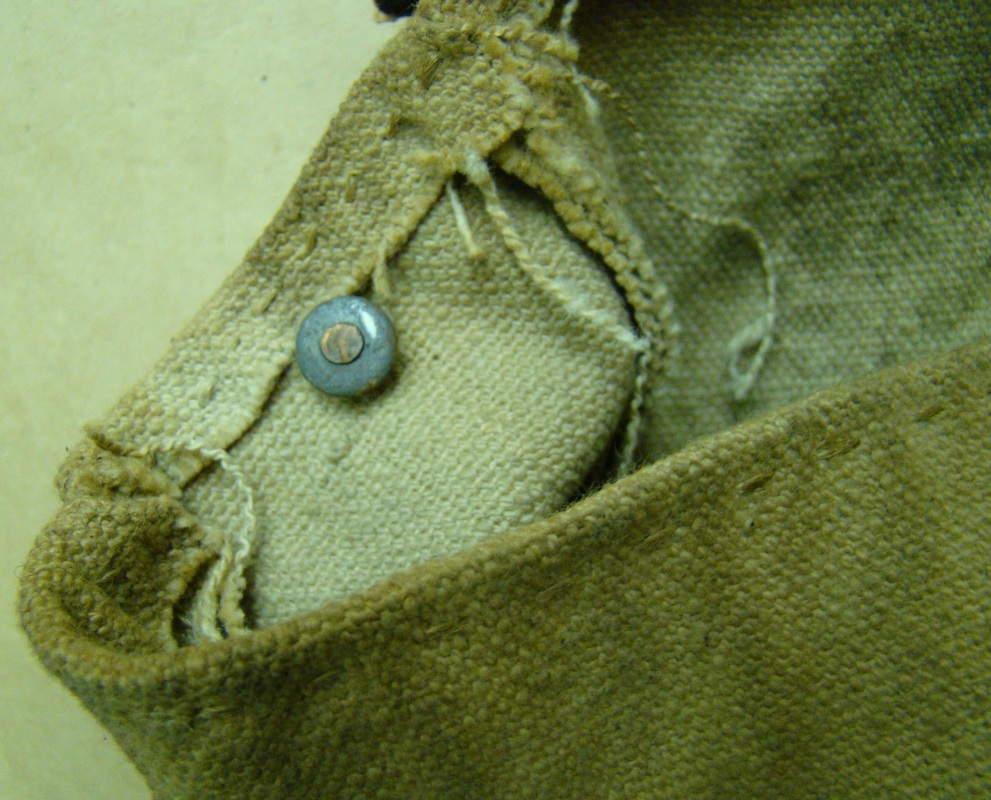
Image 33: The right finial viewed from the inside appears to be secured with a lead washer. This view also shows the loose basting stitch employed throughout the satchel.
|

Image 34: The left side piece gusset and strap mirror the right side to include the same type of brass finial.
|

Image 35: The inside left of the satchel has the same swivel arrangement for the strap's finial.
|

Image 36: This close-up shows how the tie tap on the front flap is loosely attached with a basting stitch.
|

Image 37: More provenance is visible in this view of the flap's inside. Again, the loose basting stitch is in evidence where the front flap has been joined to the rear of the satchel.
|

Image 38: This image highlights the stitching on the flap.
|

Image 39: Another view shows construction details.
|

Image 40: The top edge of the satchel was folded over and clumsily basted in place.
|

Image 41: It is a wonder that the bottom seams did not come unraveled as loosely as this was sewn, and with the weight it must have carried.
|

Image 42: The bottom of the satchel had a completely separate piece as can be seen here.
|

Image 43: The inside of the bottom piece allowed for a very generous load of food in the body of the satchel.
|
The author would like to thank Mr. Richard Ferry of the Florida Confederate Museum for his generosity in sharing these wonderful artifacts. As time permits, more of the Florida Confederate collection will be studied and shared on this website, as well. Readers are also reminded that the images herein are property of Adolphus Confederate Uniforms and may not be reproduced without the consent of the author.